
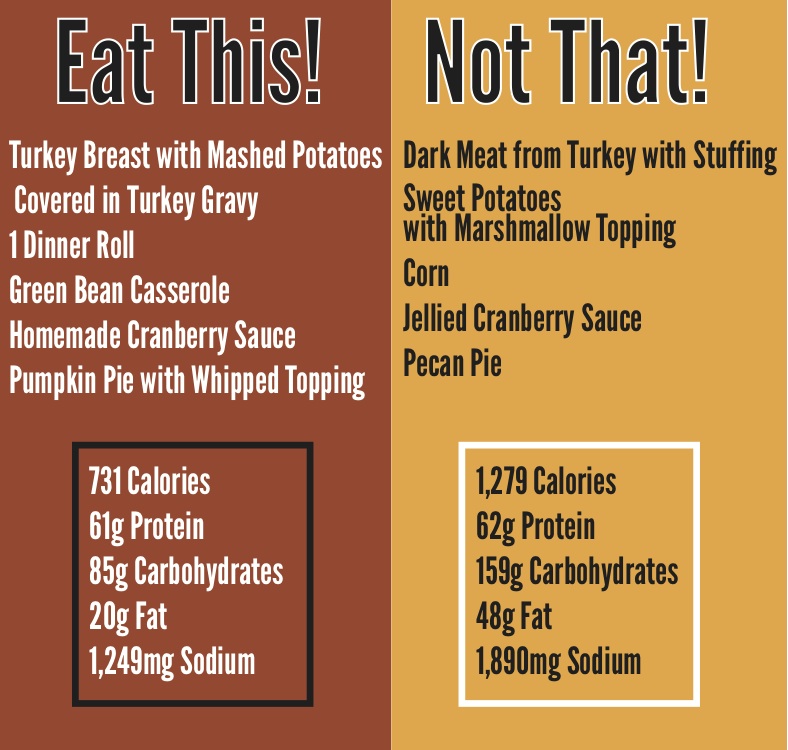
Here are some helpful tips and some AMAZING recipe options that will keep your waistline from bulging. Keep in mind portion sizes and be sure to never arrive hungry, drink plenty of water throughout the day and hold out for the good stuff! Example: pick your favorite dessert and ditch everything else or create a small sample plate of 3 that you'd like to try! Also, if joining someone else for the big day, bring your own favorite healthy dish along to be sure you have something you are comforatble eating that you know is healthy.
One FUN thing I love to do at the dinner table is for each person to say what they are thankful for this year. It brings back memories and fun times as you recap everyone's favorite moments! :-) As for the little ones, have them join you or set them at a kids table and provide them with paper and crayons and tell them to draw what they are thankful for and they can share it with everyone too! :-)

Check out these delicious recipes below and feel free to share your favorite Thanksgiving recipe below too! Cheers!
Click here to see what i'll be making-----> awesome BREAKFAST option that I love that would be GREAT to serve your family on Thanksgiving morning!!! You can add what you love and make several different ones for your loved ones based upon the foods they like as well! ;-) You can make the night before and re-heat or cook in the morning. This way, you can eat well without a huge amount of kitchen work!
Here are two other yummy breakfast options:
TEXAS STYLE CRUSTLESS QUICHE
Ingredients:
6 slices of turkey bacon, 1 medium sweet onion, diced, 1 medium red bell pepper, diced, 10 oz. fresh baby spinach, 8 oz of grated cheddar cheese, 5 eggs, 1/2 Cup reduced fat milk, ground chipotle pepper to taste and fat of choice (I prefer coconut oil)
Directions:
1. In a cast iron skillet, grill bacon over medium heat until cooked. Remove bacon from skillet and add onions & red bell peppers. Cook until onion becomes translucent. Add spinach and stir until wilted. Remove pan from heat, stir bacon back into mix.
2. In the meantime, mix cheese, eggs, milk, and chipotle pepper in a medium mixing bowl. Add vegetable and bacon mix and stir until blended.
3. Grease a 9-in pie shell with your fat of choice. (I use coconut oil.) Pour quiche mixture into pie shell. Bake at 375F for 40-45minutes or until filling is set. Let rest for 10 minutes before serving. ENJOY ya'll!
GRAIN-FREE APPLE PANCAKE RINGS
Ingredients:
2 medium apples, sliced thin and cored
3 eggs from pastured hens
3 Tbs. coconut oil or melted butter plus extra for cooking the pancake
3 Tbs milk or coconut milk
1 tsp. raw honey
1/2 tsp. sea salt
1 tsp. cinnamon
3 Tbs. coconut flour
Directions:
In a mixing bowl, whisk together eggs, coconut oil, milk, honey, cinnamon, and salt. Once evenly mixed, whisk in coconut flour. Stir until evenly mixed, then let sit for 5 minutes.
Heat a griddle or cast iron skillet to medium heat. Melt a dab of coconut oil on your cooking surface. While that’s heating and your batter is resting (an essential step when working with coconut flour), this is a good time to peel, slice, and core your apples if you haven’t already.
Before coating your apples, double check that the batter is at pancake consistency. Coconut flour is VERY absorbent, so it’s possible that if it sits too long it will get too thick to easily coat the apples. If your batter is a bit thicker than normal pancake batter, just add more liquid (water, milk, coconut milk, or even eggs) until it is the right consistency.
Using a toothpick, pick up an apple ring and dunk it in the pancake batter. Then, put it on the griddle. Repeat for as many apple pancake rings as you’ve got room to cook. Once the batter has cooked firm around the edges and turned golden brown, flip once to cook the other side to golden brown.
When finished, serve apple pancake rings warm. We love serving it up with slices of cheese or with pure maple syrup.
Here are some healthy sides I will be making on Thanksgiving...
ROSEMARY & GARLIC MASHED CAULIFLOWER

PREP TIME
TOTAL TIME
Author: Becky Hardin - The Cookie Rookie
Serves: 4
INGREDIENTS
- 1 large cauliflower, chopped into small florets
- 3 ounces low fat cream cheese
- 2 tablespoons unsalted butter
- 1½ teaspoon minced garlic (sauteed if you aren't buying it already prepared)
- 1 tablespoon fresh rosemary, chopped into small pieces
INSTRUCTIONS
- Bring a medium pot of water to boil. Once boiling, cook the cauliflower for 8-10 minutes or until fork tender. Remove and drain cauliflower.
- Place cauliflower along with all other ingredients into a blender or food processor and pulse until smooth and creamy. Compliments of thecookierookie.com
 SUMMER VEGETABLE TIAN
PREP TIME
COOK TIME
TOTAL TIME
Serves: 6
INGREDIENTS
- 1 Tbsp olive oil
- 1 medium yellow onion
- 1 tsp minced garlic
- 1 medium zucchini
- 1 medium yellow squash
- 1 medium potato
- 1 medium tomato
- 1 tsp dried thyme to taste salt & pepper
- 1 cup shredded Italian cheese
INSTRUCTIONS
- Preheat the oven to 400 degrees. Finely dice the onion and mince the garlic. Saute both in a skillet with olive oil until softened (about five minutes).
- While the onion and garlic are sauteing, thinly slice the rest of the vegetables.
- Spray the inside of an 8×8 square or round baking dish with non-stick spray. Spread the softened onion and garlic in the bottom of the dish. Place the thinly sliced vegetables in the baking dish vertically, in an alternating pattern. Sprinkle generously with salt, pepper, and thyme.
- Cover the dish with foil and bake for 30 minutes. Remove the foil, top with cheese and bake for another 15-20 minutes or until the cheese is golden brown.
Compliments of budgetbytes.com
Best Ever Green Bean Casserole
Recipe courtesy of Alton Brown
Total Time: 1 hr 10 min
Prep: 25 min
Cook: 45 min
Yield:4 to 6 servings
Level:Easy
Ingredients
For the topping:
2 medium onions, thinly sliced
1/4 cup all-purpose flour
2 tablespoons panko bread crumbs
1 teaspoon kosher salt
Nonstick cooking spray
For beans and sauce:
2 tablespoons plus 1 teaspoon kosher salt, divided
1 pound fresh green beans, rinsed, trimmed and halved
2 tablespoons unsalted butter
12 ounces mushrooms, trimmed and cut into 1/2-inch pieces
1/2 teaspoon freshly ground black pepper
2 cloves garlic, minced
1/4 teaspoon freshly ground nutmeg
2 tablespoons all-purpose flour
1 cup chicken broth
1 cup half-and-half
ADD CHECKED ITEMS TO GROCERY LIST
Directions
Preheat the oven to 475 degrees F.
Combine the onions, flour, panko and salt in a large mixing bowl and toss to combine. Coat a sheet pan with nonstick cooking spray and evenly spread the onions on the pan. Place the pan on the middle rack of the oven and bake until golden brown, approximately 30 minutes. Toss the onions 2 to 3 times during cooking. Once done, remove from the oven and set aside until ready to use. Turn the oven down to 400 degrees F.
While the onions are cooking, prepare the beans. Bring a gallon of water and 2 tablespoons of salt to a boil in an 8-quart saucepan. Add the beans and blanch for 5 minutes. Drain in a colander and immediately plunge the beans into a large bowl of ice water to stop the cooking. Drain and set aside.
Melt the butter in a 12-inch cast iron skillet set over medium-high heat. Add the mushrooms, 1 teaspoon salt and pepper and cook, stirring occasionally, until the mushrooms begin to give up some of their liquid, approximately 4 to 5 minutes. Add the garlic and nutmeg and continue to cook for another 1 to 2 minutes. Sprinkle the flour over the mixture and stir to combine. Cook for 1 minute. Add the broth and simmer for 1 minute. Decrease the heat to medium-low and add the half-and-half. Cook until the mixture thickens, stirring occasionally, approximately 6 to 8 minutes.
Remove from the heat and stir in 1/4 of the onions and all of the green beans. Top with the remaining onions. Place into the oven and bake until bubbly, approximately 15 minutes. Remove and serve immediately.
Recipe courtesy of Alton Brown, 2007
Stovetop Mac and Cheese
Prep Time: 10 minutes
Cook Time: 20 minutes
Total Time: 30 minutes
Yield 4 servings
A quick and easy, no-fuss mac and cheese made in less than 30 min. Comfort food never tasted so good!
Ingredients:
3 tablespoons unsalted butter, divided
1/2 cup Panko (I like Ian's)
1/2 teaspoon thyme leaves
1 1/2 cup 2 % shredded sharp cheddar cheese (I like Sargento)
1 cup shredded Monterey Jack cheese (2% if you can find it)
1 tablespoon cornstarch
8 ounces fusilli pasta (or your favorite)
1 (12-ounce) can evaporated milk
1 tablespoon Emeril's Essence Creole Seasoning
Kosher salt and freshly ground black pepper, to taste
Instructions
- Melt 1 tablespoon butter in a small skillet over medium high heat. Add Panko and cook, stirring, until browned and toasted, about 3 minutes; stir in thyme and set aside.
- In a large bowl, combine cheeses and cornstarch; set aside.
- In a large pot of boiling salted water, cook pasta according to package instructions; drain well. Stir in remaining 2 tablespoons butter until well combined. Stir in cheese mixture, evaporated milk and Emeril's Essence until cheese has melted, about 2-3 minutes; season with salt and pepper, to taste.
- Serve immediately, topped with toasted Panko. - Compliments of Damn Delicious
AND OF COURSE A FAVORITE HEALTHY DESSERT OPTION compliments of Ginger Miller! ;-) So light and YUMMY!!

I hope you and your family have an amazing holiday surrounded by those you love! God bless! <3
Oh! And one more thing! My "Cash for Christmas Challenge" starts Dec.1 if you'd like to find out how to get healthy and lose some inches before Christmas AND have a chance to win a chance to win some cash for Christmas just by getting amazing results. Click HERE and I will send you some details--don't forget to type "Cash for Christmas" in the subject line of your email. <3
-Stacy

